Part Two: Line Drawing.
Okay, if you followed my first lesson, then you're well aware of how all your paints and pencils and crayons and what have you work, right? Great. Now we're going to focus on drawing lines.
Exercise One: Basic Line Drawing
You'll need paper of some kind (this is just practice, so you don't need anything expensive or fancy) and a pencil or pen. Choose four objects in your immediate vicinity...maybe your wristwatch, the telephone, a decorative knickknack, the vacuum cleaner...it doesn't matter, so long as there's some interest to it's shape and it's not simply a geometrical shape of some sort. Draw the object using fluid, continuous movements, lifting the pen or pencil as rarely as possible. Do not add shadow--just outline all the basic parts without sketching first. Use no tools. Don't worry about perfect measurements or perspectives. Concentrate solely on depicting the item as though it will be shaded and colored later.
Exercise Two: Flat Image Line Drawing
Now, again using only your pencil or pen and paper, choose four new items around you to draw, but make sure parts of it overlap. Try and see the objects as whole and flat as though they were cardboard cutouts. Draw only the outer edges of everything, but put no lines to indicate where parts overlap. A chair is a good study, just don't draw the base of the seat, then set a leg below it--draw the edge of the seat meeting the edge of the leg, then follow the leg around back to the edge of the seat and move on to the next proturbence. You could try drawing a houseplant this way or a pet, a vehicle, a lamp. Pretend a photo of the item might be placed over your outline later--like the empty shapes where you put the appropriate sticker in a kid's activity book.
Exercise Three: Single Line Drawing
Choose from your mind any four items you like to draw anyway, such as a dog, a sailboat, a tree, a flower... Without looking at anything as a guide, draw your chosen items one at a time using one single, flowing line of ink or graphite. NEVER lift your pen or pencil to draw another part of the item. You'll find you may have to double back over a part you've just drawn, but just don't cross any lines! If you don't like how the item turns out the first time, keep drawing it using this method until you are satisfied with your improvements. Once you feel comfortable drawing in this "stencil"-like style, then try drawing the items again using a single line, but allow yourself to cross a few of the lines as you do it.
Exercise Four: Light And Shadow
For this part, you'll need light colored paper with dark ink or a pencil and black paper with light colored gel pens or white charcoal.
We'll start with the easier technique. Shadow drawing. Imagine a generic human face on the blank light colored paper in front of you. Now draw in only the areas which would be shadowed if the figure was harshly lit. If it helps, color the areas you draw in with your pen or pencil, making solid, dark shapes on the paper. Try to imagine the ridges beneath the eye socket, the area between upper eyelid and eyebrow, the soft shadow below the lower lip and above the chin. Do NOT sketch a face first and draw over it. Don't worry if the placement of features is a bit off. Imagine your light source is hitting from one area only, then show where the shadows should lay. Try this technique drawing whole humans or animals as well.
For the second part, you're doing almost the opposite with your black paper and gel pens. Do not draw the shadowed areas this time, but the lightstruck ones. Show the ball of the nose and the highlights of the cheekbones, the lower lip, the broad forehead, the whites of the eyes and even the highlights upon the eyes, but no lines beyond those. Draw nothing where shadow would fall. These light and shadow images should appear almost as though something is emerging from your paper or fading into nothingness. Once you've done a few faces, try whole humans and animals.
Exercise Five: Scribble
You'll need paper and something to draw with. We're gonna use human faces again. Without first drawing or sketching any part of a human face, take your drawing tool and start scribbling without ever lifting the tool until you are finished, and go ahead and depict a recognizeable generic human face. Use one scrawly, scratchy, loopy, whirly line only and scribble in shadows and details as messily as you wish, so long as the end product can be recognized as a human face by someone else. Try drawing animals this way. Once you've had fun scribbling up some nice artwork, go ahead and scribble up another masterpiece, but lift the drawing tool wherever you wish, allowing features to be seperate from each other. Try drawing animals or other objects this way until you feel comfortable with it.
Exercise Six: Line Shading
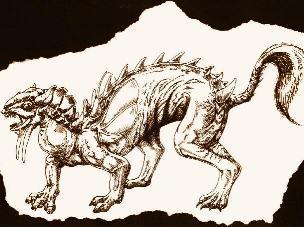
The drawing I've included with this article is a pen and ink piece using some cross hatching to create shadows and depth. Cross hatching is one of my favorite techniques and one I'm known for. It's easy to use and can be layered to heighten the sensation of depth.
First, draw any simple object--a sphere, or a face, maybe a piece of furniture, whatever. Think about the object and where light should strike it. Where shadow would fall, draw lines moving from the object's outer edge or near it up toward where the light should be shining. For example, on a human foot planted on the ground, I would draw short lines from the bottom line of the foot up toward the top of the foot, but I would try to follow the foot's natural form. I'd have very short lines below the toes, lengthening slightly between toe pads and the ball of the foot, then short lines following the curve of the ball (but only straight lines going straight up--not contours), deeper lines along where the arch exists, shallower as we reach the heel, with a few short lines below where the ankle would be. The light in this example would be shining directly down atop the foot. On a face, the lines would go from the eyelid crease up toward the brows, mayeb a few short lines along one brow ridge toward the nose, a few lines below the ball of the nose and across the upper lip, some lines along the cheek hollows, lines over most of the upper lip, a few below the lower lip extending almost to the chin... Basically, wherever you would have drawn shadows in Exercise Four, you will now be putting straight lines. They needn't be perfectly straight, just toss them in quickly and try to imagine how light and shadow would define each other. To create a little depth, move your imaginary lightsource to the right or left of the item, but still coming down from the top of the paper. You may tilt your paper if you wish and start using lines to draw the shadows from this new angle of light, overlapping the original lines of shadow you drew. Wanna get even more dimensional? Move the lightsource again, imagining it from the immediate right or left of the object, preferably due south of where you imagined it for the second stage of shadow drawing. You can also shade using dots. Draw them larger and/or closer together for darker shaded areas and smaller or farther apart for lightly shaded ones. Sometimes I tilt my pen severely so that the ink does not flow smoothly, creating scratchy looking lines that produce a lighter form of cross hatch shading. You can also combine lines and dots or dots and dashes or dashes and lines. For contour shading, just examine the President on any handy American dollar bill.
Exercise Seven: Line Width Shading
Sometimes, to add deeper shadows to a subject or make it stand out even more from the background, I'll go heavier on the outlines anywhere shadow might be especially dark. On a face, I might outline the chin and jaw or lower eyelid or lips or nostrils in a thicker width pen or marker, or just go over these lines a few more times than outlines over well lit areas. Draw a face or animals or person or any object with some interest to it's shape, then use thicker pens or blunter pencils to outline the areas which you think should be shaded.
For further practice, feel fry to combine any of these techniques as you continue drawing. Remember that if you use cross hatching or similar shading techniques with light media on dark paper, you might want to draw the lit areas in this method rather than the shadows, putting lines of lighter color wherever light would fall. Experiment freely with dark and light paper, dark and light pens or markers or what have you. Create a still life from random objects, then use these techniques to do a series of variations on the same image, a la Andy Warhol.
I do most of my drawing on notebook paper with handy ballpoints, but you're welcome to invest in a small sketch pad or sketch journal at this point just to feature different techniques and watch your ability evolve. I found a really cheap photo album with heavy black pages and no plastic sheets discounted at a hobby shop. It's perfect for drawing with gel pens, white charcoals, or metallic inks or crayons. It's a fun challenege to draw the light instead of the shadows. Don't worry about accuracy just yet--just make things recognizable and you're doing fine.
'til the next lesson, keep drawing! Art is fun, it's therapeutic, it's very fulfilling and rewarding. My lessons won't grant you gallery openings in Manhattan, but they should be a pleasant diversion and part of a journey of self exploration and discovery.
You can see some of my art through the link which follows, but I'm warning you now that some of the images are a bit racy and not intended for children to ponder.
|